
BackendStudio – Screen Recorder & Video Editor for Windows
Record your screen and edit the footage into a finished video — all in one native Windows app. Capture any display with system audio and microphone narration, drop your clips onto a multi-track timeline, cut, split, merge and arrange them, add effects and transitions, mix the audio, then export a single polished MP4. Playback is real time — press Play and the preview starts in about a quarter of a second, with no waiting for a render, however long the project is. Titles work in Urdu and Arabic too — properly joined, right-to-left, with Nastaliq and Naskh faces in the box and keyboards built in, so you never change a Windows setting or paste through a converter website. Perfect for tutorials, demos, walkthroughs and presentations. Free to use, with a one-time Pro upgrade that removes the export watermark — it works entirely on your own machine and never uploads your recordings.
Download BackendStudio
Available on the Microsoft Store — free to use, with an optional one-time BackendStudio Pro upgrade. No subscription, no ads.
Or view the listing at apps.microsoft.com.
Free to use — with a one-time Pro upgrade
Every recording and editing feature is free — screen and webcam capture, the multi-track timeline, titles, transitions, effects and MP4 export. The free tier adds a small “Created with BackendStudio” watermark to your exported video (the preview stays clean while you edit); a one-time BackendStudio Pro upgrade removes it. Pro is a one-time purchase, not a subscription.
Record and edit in one place
No more juggling a separate recorder and editor. BackendStudio captures your screen and lands the recording straight in the media bin, ready to trim and arrange on the timeline — then export a finished MP4. Everything runs on your PC; your footage never leaves the device.
Urdu & Arabic titles, with zero system setup
Type Urdu or Arabic straight into the title box and it comes out right — letters joined, in their correct contextual forms, reading right-to-left, identical in the Inspector, the preview and the exported video. Latin words and digits inside an Urdu sentence land where they belong. No text-reversing website, no OS language pack, no administrator rights. Windows ships no Nastaliq face at all, so BackendStudio brings its own: Noto Nastaliq Urdu and Amiri, in the box.
Changelog — what’s new in each release
Full release history — Urdu and Arabic titles with in-app fonts and keyboards, screen recording, the multi-track timeline, editing, titles, export, real-time playback, the Effects and Transitions panels with 58 blend transitions and privacy blur regions, per-property keyframe animation with a transport bar, and pause/resume, countdown, global hotkeys, crash recovery and the freemium Pro upgrade.
View the full changelogUser Guide — every step explained
A plain-English walkthrough of recording, importing, the timeline, splitting & trimming, effects, transitions, Urdu & Arabic titles, audio, playback, exporting and projects — and the keyboard shortcuts.
Read the User GuideFeatures
🎥 Screen Recording
Record any display at your chosen frame rate, with system audio, microphone narration and an optional webcam/camera overlay — ideal for tutorials and reaction-style demos. Start with a pre-record countdown, pause and resume mid-take (paused time is dropped from the finished video), and drive it all with system-wide hotkeys so you never alt-tab into your own shot. Smooth constant-frame-rate capture keeps audio and video in sync, and each recording drops straight into the media bin ready to edit.
🎬 Multi-Track Timeline
Arrange your footage on a professional multi-track timeline — stacked video and audio tracks with a ruler, playhead and zoom. Drag clips to position them, trim with edge handles, and snap to the playhead and neighbouring clips (hold Shift to snap freely).
✂️ Cut, Split, Merge
Split a clip at the playhead, copy and paste, merge adjacent pieces back together, and move clips between tracks. Editing is non-destructive — your original files are never modified — and everything is covered by full undo/redo.
📥 Import Your Own Media
Bring in existing video, audio and images by drag-and-drop or a file picker. The media bin shows a thumbnail, resolution and duration for each item, with waveforms for audio — so you always know what you’re grabbing.
▶️ Real-Time Playback
Press Play and the timeline plays immediately — about a quarter of a second, whether the project runs thirty seconds or thirty minutes. Nothing is rendered to a file first and nothing is written to disk, so there is no progress bar between you and your edit. Anything genuinely too heavy to composite live is quietly rendered ahead in the background while you’re paused, and a thin bar under the ruler tells you where you stand before you press Play.
🔊 Audio Mixing
Set per-clip volume, add fade in and fade out, and mute or solo whole tracks. All audio is mixed down into a single clean track on export, honouring your mute/solo choices.
🖼️ Clip Adjustments & Keyframes
Fine-tune each clip from the Inspector — reposition, scale and rotate a clip for picture-in-picture, set its opacity for overlays, tweak colour (brightness, contrast, saturation, temperature and hue), crop any edge, change playback speed, and dial in volume and fades. Position, Rotation and Opacity can each be animated with keyframes on their own independent schedule — a key button beside each property shows whether it’s animated, and a transport bar steps straight from keyframe to keyframe. Stacked video tracks composite in order, so overlays sit exactly where you want them.
🎬 Titles & Transitions
Add titles to caption your video — in English, or in Urdu and Arabic — and the Titles panel lists every label in the project with its start time, so one click jumps you to it. Smooth the joins between clips with a crossfade or a slide, fade the whole video in from black and out to black, or crossfade every cut on a track in one go. And for real two-clip transitions there are 58 blends — wipes, pushes, circle crops, radial, pixelize, blur and zoom — which mix the two pictures together rather than just fading one over the other.
🇵🇰 Urdu & Arabic Titles
Type or paste Urdu and Arabic straight into the Title text box. Letters join, take their correct contextual forms and read right-to-left — in the Inspector as you type, in the preview, and in the exported video, all from the same rendered image so none of them can disagree. Mixed text works too: Latin words and digits inside an Urdu sentence land where they belong. A Direction control — Auto, Left to right, Right to left — handles the one case no automatic rule can get right: a label that opens with a Latin word but is mostly Urdu.
🖋️ Nastaliq & Naskh, In the Box
Windows ships no Nastaliq face at all — the style most Urdu is actually set in. BackendStudio brings its own: Noto Nastaliq Urdu and Amiri (Naskh), both under the SIL Open Font License. The font picker lists every font on your system and draws a sample of real Urdu or Arabic text in each face beside its name — because on Arabic-script fonts the name alone tells you nothing about whether a face is Naskh or Nastaliq, or whether it can set Urdu at all. You see it before you commit a title to it.
⌨️ Keyboards Without the Install
Three keyboards live inside the app — a Keyboard dropdown sits right beside the title text in the Inspector, where the typing actually happens (it is on Tools ▸ Keyboard too). So you can type Urdu or Arabic on a machine where you can’t add a Windows language pack: a shared PC, a lab, a locked-down work laptop. Urdu and Arabic — Windows standard put the letters exactly where the real Windows drivers do, so existing muscle memory transfers; Urdu — phonetic (CRULP) types by sound for anyone who doesn’t type Urdu daily. Araabs sit on AltGr. It affects the title box only, and never touches how you type anywhere else in Windows.
📁 Your Fonts, Without the System Install
Downloaded a calligraphic Arabic face or a particular Nastaliq you like? Tools ▸ Install Fonts takes any font file you have already downloaded and adds it to BackendStudio’s own font folder, where they show up in the dropdown immediately — no restart. They are not installed into Windows, so it needs no administrator rights, clutters no system font list, and changes nothing for any other application. Open fonts folder shows you exactly where they live.
🎨 Effects & Looks
Grade a clip in one click with a Look — Warm, Cool, Punchy, Faded, High contrast or Black & white — then fine-tune it. Blur, sharpen, vignette, hue, colour temperature and mirror / flip (the usual fix for a webcam that records you the wrong way round) are a tile each, and per-clip crop trims any edge. Every effect on a clip is listed with its current values, can be switched off without losing its settings, and can be copied and pasted onto another clip.
🕶️ Privacy Blur Regions
The one for tutorial recordings. Draw a box over an API key, an email address or an account number and it’s hidden in the export — blurred or pixelated, your choice per box. Drag and resize them right on the preview, and give each one its own stretch of the clip so a value that’s only on screen briefly doesn’t cost you the whole shot.
📤 One-Click Export
Render the entire timeline into a single file at your chosen resolution and frame rate — MP4 (H.264 or H.265/HEVC), MOV, WebM or an animated GIF. Export is hardware-accelerated — it uses your PC’s graphics hardware for fast rendering, and falls back to a built-in encoder on machines without one — with a live progress bar and a Show in folder button when it’s done.
💾 Projects, Autosave & Recovery
Save your work as a project file and pick up where you left off. A friendly welcome screen offers New / Open / Recent, autosave quietly protects your progress, and crash recovery offers to restore unsaved work after an unexpected close.
⌨️ Keyboard-Driven
A dense, professional light-theme layout modelled on pro editing tools, with keyboard shortcuts for the whole workflow — new/open/save, import, split, ripple delete, copy/paste, merge, play/pause, markers and undo/redo — so editing stays fast. Ctrl + mouse wheel zooms the timeline around the pointer, so the edit you’re lining up stays under the cursor as you zoom into it.
🔒 Private by Design
BackendStudio works entirely offline — no account, no cloud upload, no telemetry. Your recordings and projects stay on your machine. Ideal for internal demos, confidential walkthroughs and anything you’d rather not send to a web service.
💸 Free, with One-Time Pro
BackendStudio is free on the Microsoft Store — every recording and editing feature unlocked, no subscription and no ads. Free exports carry a small “Created with BackendStudio” watermark; a one-time BackendStudio Pro upgrade removes it. Just download it and start recording.
Screenshots
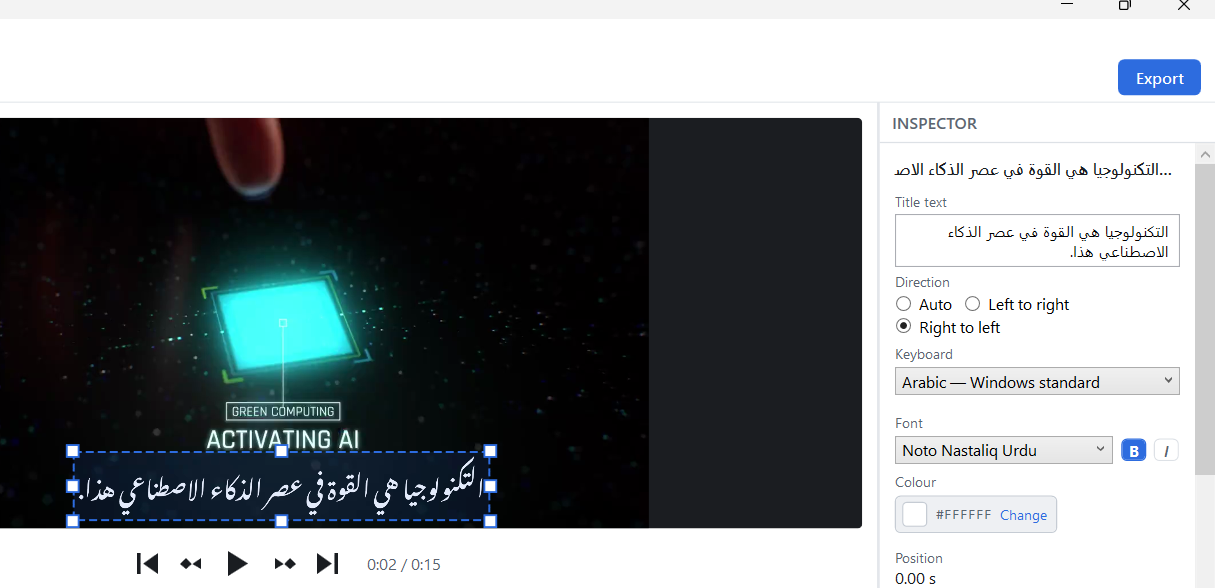
Urdu & Arabic titles — joined, right-to-left, and identical in the preview and the export
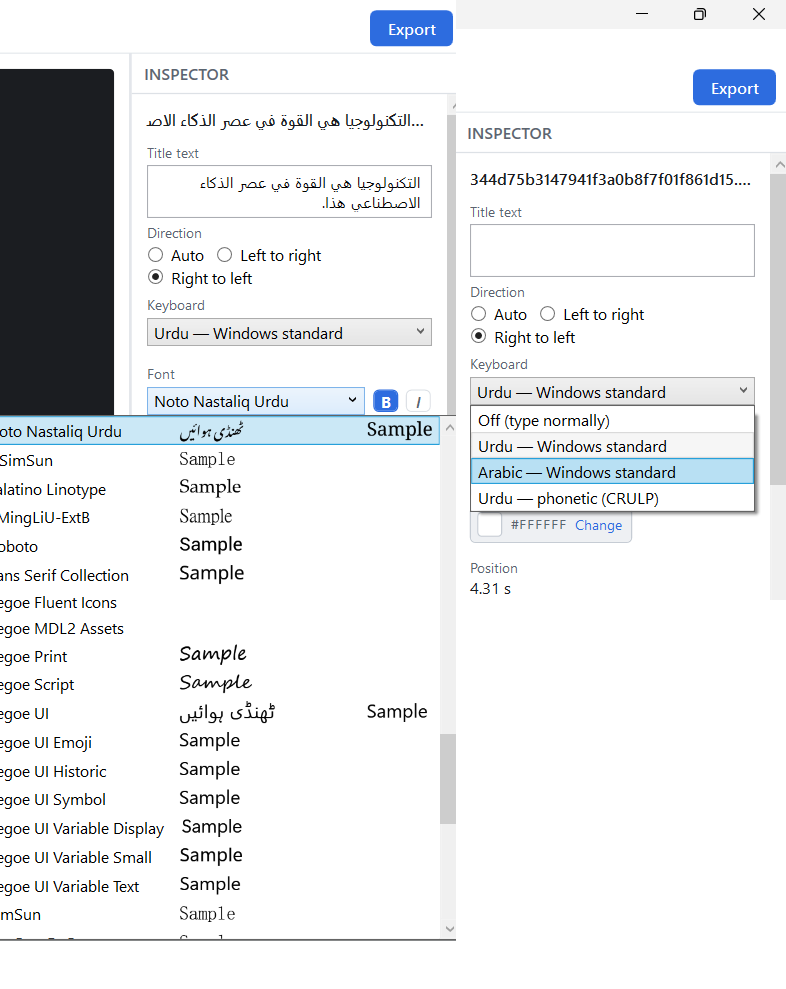
The keyboards and the font picker — four layouts in the panel where you type, and a real Urdu sample beside every font name
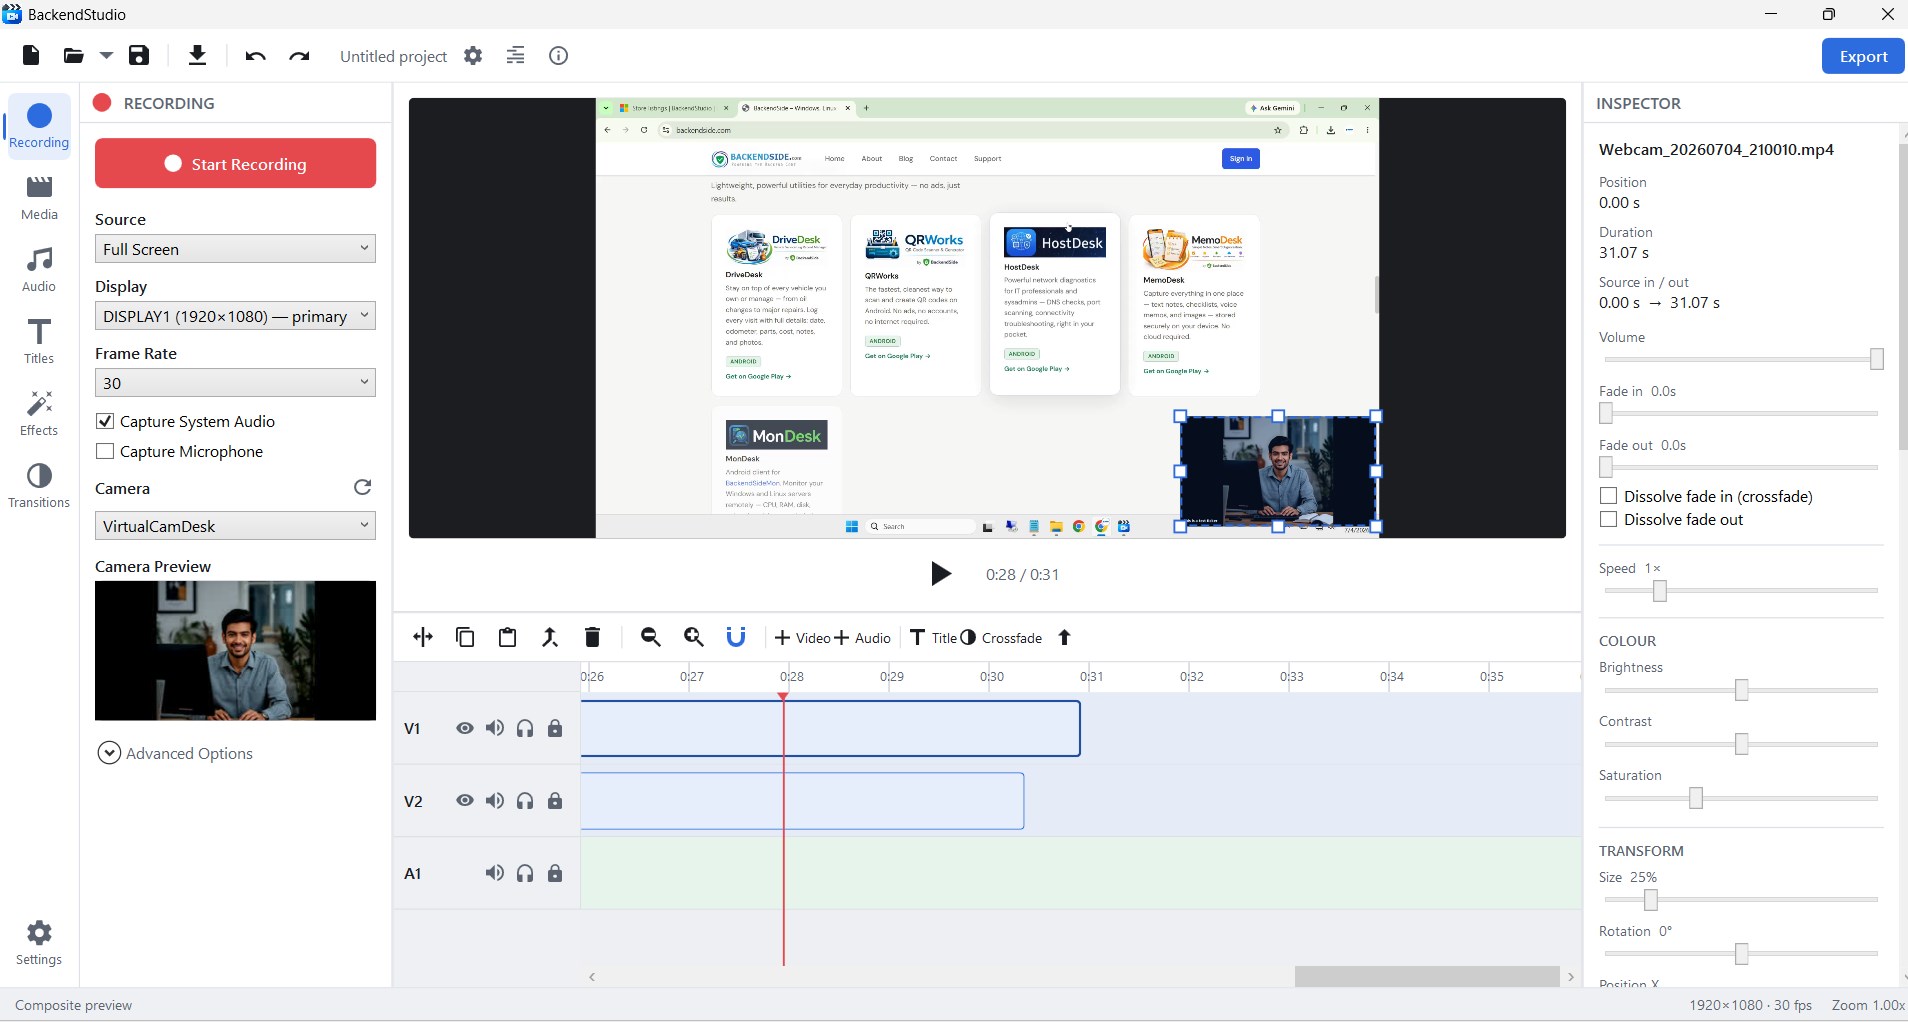
The editor — recording options with camera preview, composite preview, the multi-track timeline and the clip Inspector
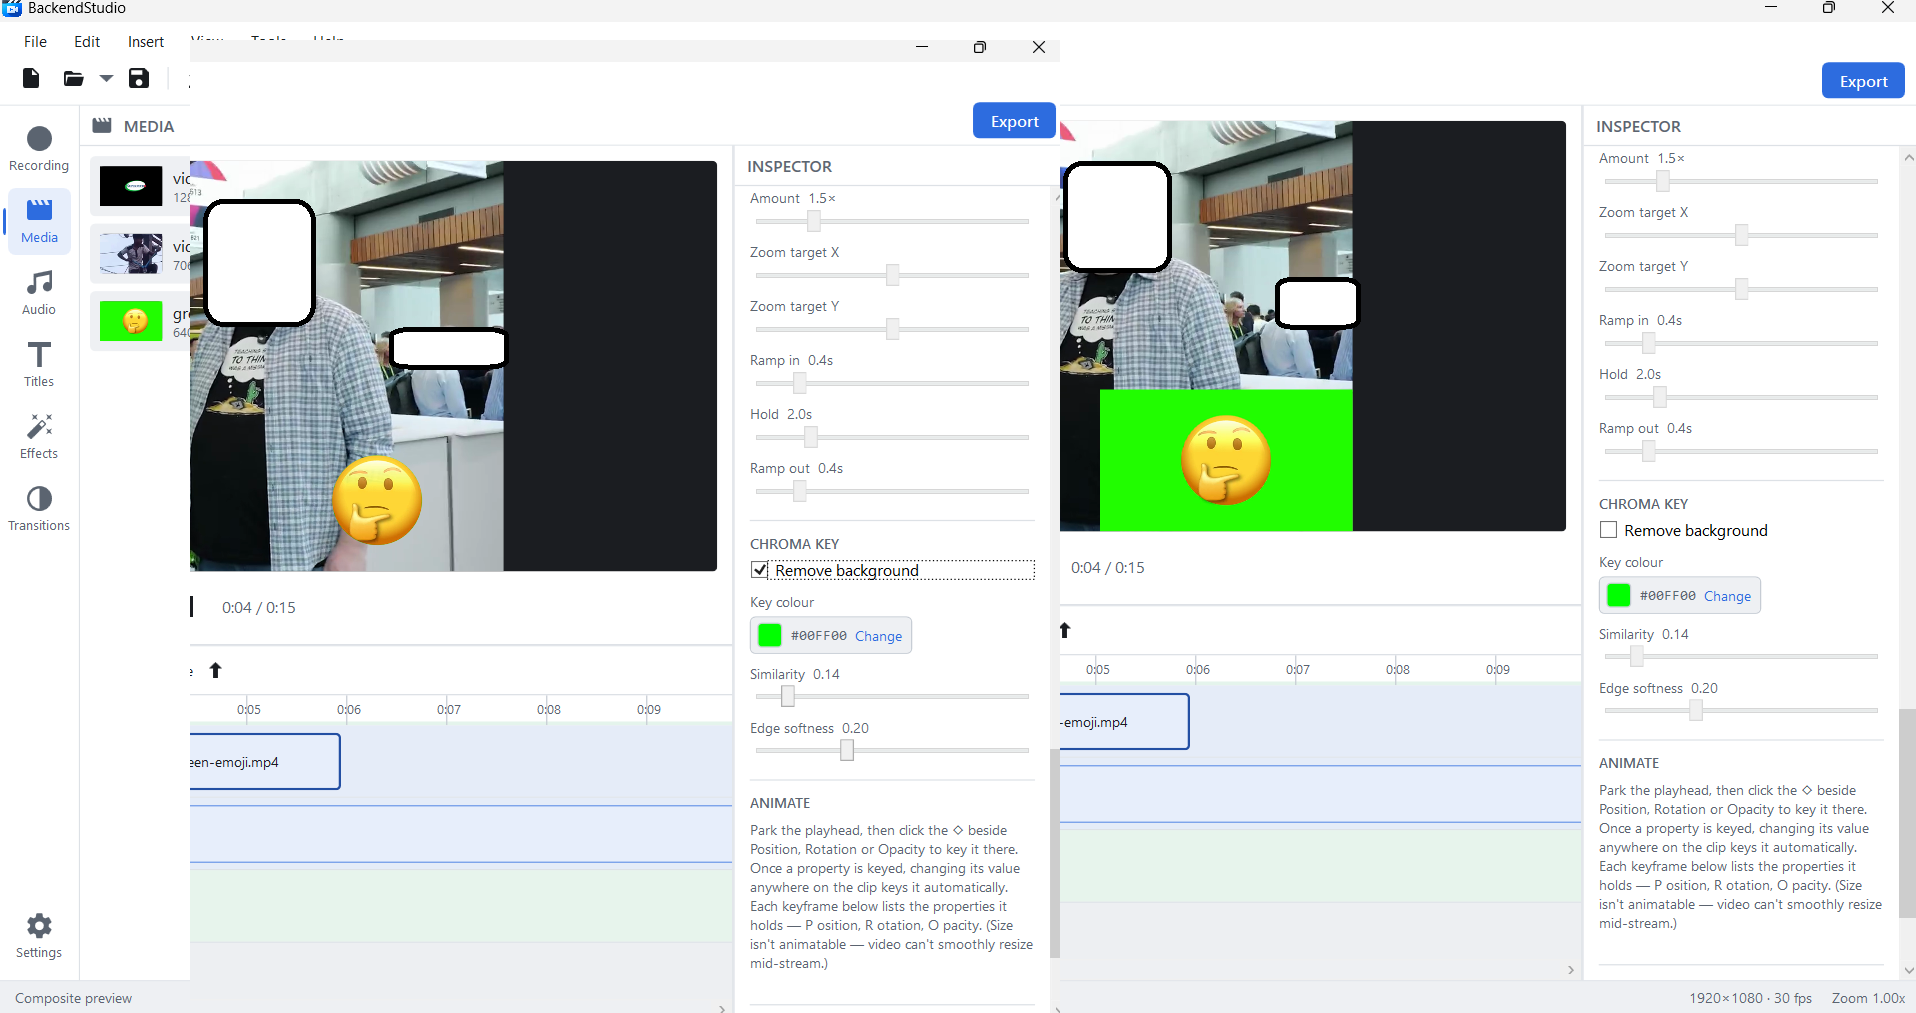
Chroma key — Remove background on the left, off on the right, with key colour, similarity and edge softness in the Inspector
Latest Release
Version 3.1.0 — 24 August 2026
Urdu and Arabic titles. Text labels now shape, join and read right-to-left correctly — in the Inspector, the preview and the exported video — with a Direction control for the mixed-script case. Noto Nastaliq Urdu and Amiri ship with the app, because Windows has no Nastaliq face of its own; the font picker now lists every font on the system and draws a real Urdu or Arabic sample beside each name. Three in-app keyboards let you type Urdu or Arabic without installing a Windows layout, and Tools ▸ Install Fonts adds your own faces with no restart and no administrator rights. Also new: a menu bar.